prayasindia
The advantage of this technology is that the
site can be viewed without downloading any fonts.It has eliminated the
need for you to download and install fonts to read Web pages.Dynamic
fonts can be used for seamless viewing of the contents (web pages)
when the corresponding font in which the content has been created is
not present on clients machine. The Dynamic fonts are placed on the
server on which the web pages are hosted. They travel to the client
machine in a manner transparent to the user. They remain in the cache
of the users machine till the time he is viewing a particular webpage
and are rendered back the browser once the user exits out of the
website.Dynamic fonts are of 2 types : EOT's and PFR's
EOT - Embedded Open Type format is Microsoft technology of sending
encoded fonts to the user. Embedded Open Type (EOT) are dynamic fonts
generated from Microsoft's WEFT technology. The dynamic font generated
will have the extension as .eot .If you have a link to an EOT on your
page then the browser uses these EOT's to display the page with
specified fonts (only IE 4.0 and above support EOT's). EOT's have
specific URL roots so that only specified Web sites can use specific
EOT's made for them. Once an EOT is prepared it is locked to that URL.
So the same EOT cannot be used again for some other site.
PFR - Portable Font Resource is another way of sending fonts
dynamically to the user. These are prepared using Bitstream's Web font
Technology. Any True Type Font can be converted to Dynamic Font. The
dynamic font generated will have the extension as .pfr. It can be used
both in Netscape (4.03 and above) and IE (4.0 and above). In IE
however, there is a one-time download of a control on the client's
machine. (Please note that Dynamic fonts are not supported from
Netscape 6.0 onwards).
Note: PFR's and EOT can co-exist on a single site. The Browser will
sense the dynamic font and accordingly display.
Usually a JavaScript is used to query the browser and accordingly PFRs
or EOTs are given to the client so that a particular font can be
displayed without user's intervention. They can be placed on the
server on which the web contents
This technique works well with most platforms.
Internet Explorer 4.0 and above:
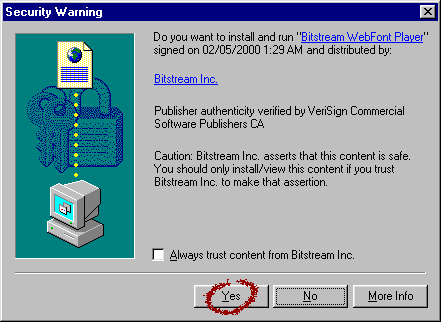
When you open the site for the first time, it will try to install the ActiveX plugin from Bitstream to view the dynamic fonts.You must allow the browser to install the plugin. If the plugin could not be installed then your security settings for the browser needs to be changed. To do that go to Tools at the top of your browser menu bar and click at `Internet Options'. Thereafter, choose the `Security' tab, select the `Default Level' button, click `Apply' and the `OK' button. The plugin has to be installed only once.
![]()
I
f you are using Microsoft Internet Explorer, you might be prompted to download the"Bitstream WebFont player". Click yes. This is a one time process only and is to be followed the very first time you browse the site.
The rest of the process is automated for you. The WebFont Player is a plug-in that Bitstream developed for Microsoft Internet Explorer � 4 (or later) for Windows�. Note that you do not need the WebFont Player for Netscape Communicator � 4 (or later). The ability to display dynamic fonts is built into Netscape Communicator.
Internet Explorer 5.0 problem:
If you are using Internet Explorer 5.0 or above browser for browsing the site, some times you may not be able to see the Indian langauge text properly. In such situations Right click on the IE 5.0 window select Encoding | User Defined encoding.
Netscape 4.03 and above:
It should work fine here. Initially the site will look gibberish. After a while the page will refresh itself and the letters will appear. This time will vary between 30 seconds to 2 minutes depending on your connection and processor speed. If you are not able to see text inspite of this, then you need to enable dynamic fonts in the browser. To do this go to Edit at the top of your browser menu bar and click at `Preferences'. Then choose `Fonts' under `Appearances' in your Preferences window. Select, `Use document-specified fonts, including Dynamic Fonts' and click the `OK' button.
You can also download the dynamic font player called WebFont Displayer from the
Bitrstream site, if you prefer.Netscape on Linux:
WebFont Displayer for Netscape is included in the Netscape setup. Netscape did not enable this displayer in some versions of Netscape for Linux. Adding the files alone to Linux Netscape does not enable it, so we do not offer the Linux version as a download from our Website.
It is our understanding from Netscape that Netscape version 4.73 for Linux should have the WebFont Displayer enabled. We have not confirmed this. The
There are two places to check to see if dynamic fonts are enabled in a Linux version of Netscape.
-
Go to:
Edit -> Preferrences -> Appearance -> Fonts Select the "Use document specified fonts, including Dynamic Fonts" option. If you do not see this option, contact Netscape.
-
On the Netscape Help menu, choose "About Font Displayers"
If the WebFont Displayer is enabled, you should see this:
TrueDoc
Bitstream's TrueDoc Portable Font Displayer
If you do not see TrueDoc listed, contact Netscape for more information.
![]()
Currently the Dynamic Fonts for Indian Languages are available for Windows Browsers Only.
|
Operating System |
Browser |
View? |
Print? |
|
Windows |
|
|
|
|
|
Netscape 4.x |
Y |
Y |
|
|
Netscape 6 |
|
|
|
|
Netscape 7 |
|
|
|
|
Internet Explorer 4 * |
Y |
Y |
|
|
Internet Explorer 5 * |
Y |
Y |
|
|
Internet Explorer 5.5 * |
Y |
|
|
|
Internet Explorer 6 * |
Y |
Y |
|
Macintosh |
|
|
|
|
|
Netscape 4.x |
Y |
Y |
|
|
Netscape 6 |
|
|
|
|
Netscape 7 |
|
|
|
|
Internet Explorer |
|
|
|
|
iCab |
Y |
Y |
|
Unix |
|
|
|
|
|
Netscape 4.03 |
Y |
Y |
|
Notes : |
To view the fonts in Internet Explorer for Windows requires a one-time download of the WebFont Player. The WebFont Player is 364 KB. |
|
|
|
|
|
Microsoft Internet Explorer 5.5 for Windows does not fully support Bitstream WebFont technology. When you try to print or print preview pages using Web fonts from Internet Explorer 5.5 for Windows, you do not get the dynamic font in the print preview or on printout. It appears that Internet Explorer dynamically rebuilds the page on the fly, stripping out the Web font tags. This prevents the dynamic fonts from printing. |
|
|
|
|
|
To print HTML Pages with Dynamic Fonts in Microsoft Internet Explorer 6 for Windows, click the print icon on the toolbar. Do not try to print the page from File > Print. |
|
|
|
|
|
Internet Explorer for Macintosh and Netscape 6 and 7 for any operating system do not |
![]()
Linking to WebFont Player Hosted by Bitstream
Bitstream hosts the WebFont Player free for anyone to use. The player is built into Netscape Communicator (v. 4x only) which means you do not need to do anything to support Web fonts for visitors using Netscape Communicator for Windows or the Macintosh.
To support visitors using Microsoft Internet Explorer for Windows, add the following lines of code to your page between the <HEAD> and </HEAD> tags and immediately following the LINK tags for your Web fonts:
<SCRIPT SRC="http://www.bitstream.com/wfplayer/tdserver.js"
TYPE="text/javascript">
</SCRIPT>
<LINK>
Note: Make sure you add this code AFTER the LINK tags for the Web fonts, otherwise the fonts may not display properly. You can put this information inside a comment tag (<!-- and -->) to hide it from older browsers.
The following example shows how the code looks after you have added a LINK tag for a Web font and the extra code to support WebFont Player:
<HTML>
<HEAD>
<TITLE>WebFont Example</TITLE>
<LINK REL="fontdef" src="/pfrs/snowcap.pfr">
<!-- add link to WebFont Player
<SCRIPT SRC="http://www.bitstream.com/wfplayer/tdserver.js"
TYPE="text/javascript">
</SCRIPT>
<LINK>
-->
</HEAD>
Reloading the WebFont Player for Internet Explorer (Windows only)
Follow these steps to remove the WebFont Player from Windows, then let it download again.
-
Close Internet Explorer
-
Open Windows Explorer
-
Open the Windows folder or the WINNT folder on your hard drive
-
Open the "Downloaded Program Files" folder
Next:
-
Open Internet Explorer
-
Reload the site with dynamic fonts
-
Accept the download from Bitstream
![]()
WEFT wizard
 You can run the WEFT wizard by selecting 'Run wizard...'
from the 'Tools' menu or clicking the 'Wizard' button. By default, the
wizard is launched automatically each time you launch WEFT. Selecting
'Tools', 'Options' and modifying the WEFT settings, lets you disable the
automatic wizard launch.
You can run the WEFT wizard by selecting 'Run wizard...'
from the 'Tools' menu or clicking the 'Wizard' button. By default, the
wizard is launched automatically each time you launch WEFT. Selecting
'Tools', 'Options' and modifying the WEFT settings, lets you disable the
automatic wizard launch.

The WEFT Wizard walks you through the following steps:
-
Prompts you for your name and e-mail address.
-
Builds a list of your Web pages.
-
Analyzes the use of fonts within these pages.
-
Lets you choose which fonts to embed and modify their character subsets.
-
Creates font objects that can only be used on the Web sites you specify.
-
Modifies local copies of your pages to link to the font objects and lets you publish these amended pages to your Web server.
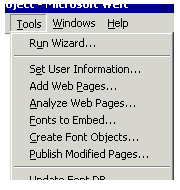 Each of these stages may also be accessed from the 'Tools' menu at any
time.
Each of these stages may also be accessed from the 'Tools' menu at any
time.
A brief overview of the wizard screens
An overview of each wizard screen is provided here. Detailed explanations of each wizard screen will be added.
Set user information
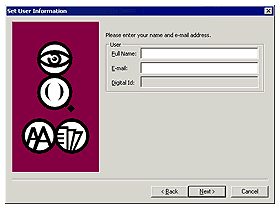
the embedded font objects you create. The 'Digital IS' section is reserved for future use. More details...
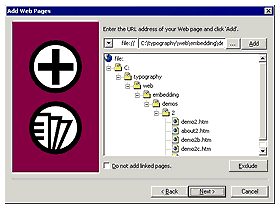
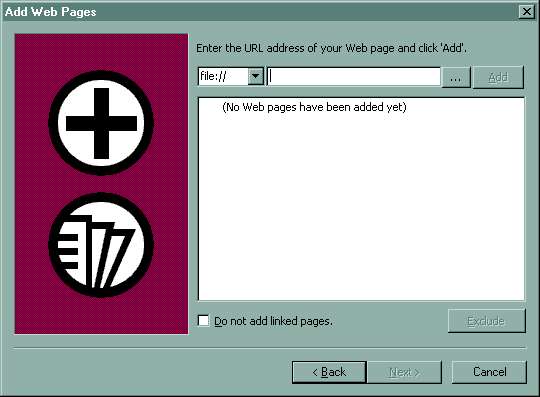
On the following screen you can tell WEFT which Web pages you'd like it to analyze for font usage. These pages can be located on a live Web site, intranet site or network or local drive. More details...
Analyze Web pages
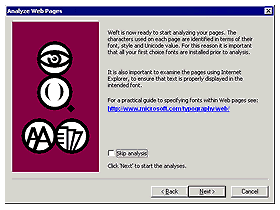
The next screen explains the page analysis process and gives you the option to skip this step if you wish. During the page analysis process the characters used on each page are identified in terms of their font, style and Unicode value. More details...
Fonts to embed
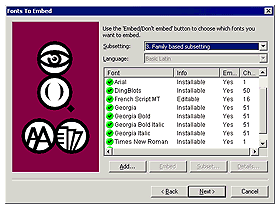
this screen you are presented with WEFTs page analysis. You can choose which fonts to embed and modify the list of characters (the subset) contained On in each font object. More details...
Create font objects
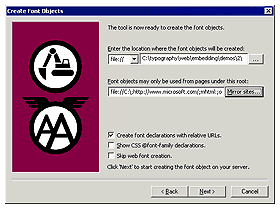
On this screen tell you can tell WEFT where to place the font objects it's about to create and the addresses from which Web pages can use the font objects. More details...
Publish Web pages
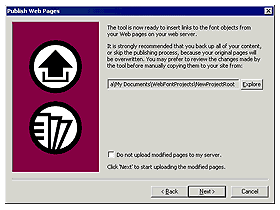
On this screen tell you can tell WEFT where to place the font objects it's about to create and the addresses from which Web pages can use the font objects. More details...
Finished!
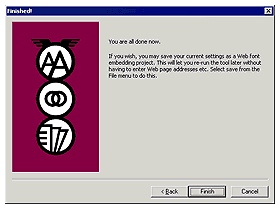
This page lets you know that the upload of modified pages to your Web site, network or local drive was successful. More details...
![]()
Creating Embedded fonts
|
|
|
The first requisite for creating EOT files is that you need to download WEFT3 from Microsoft. Click here to
download WEFT3
|
|
Creating EOT Files Having downloaded WEFT and installed it we want to give ourselves a file on which we can use WEFT to extract information to create the EOT file This entails creating a file using Notepad and declaring the name of the font we want to use. For the purposes of this tutorial I have created a small text file you can download and change to suit yourself. Click here to download it but the contents of the file are viewable in the image below |
|
<HTML> <HEAD> <STYLE> </HEAD> <BODY BACKGROUND=""
bgColor=#ffffff> <p><font
face="Tabitha" color="#000000">ABCDEFGHIJKLMNOPQRSTUVWXYZ</p> </BODY> |
|
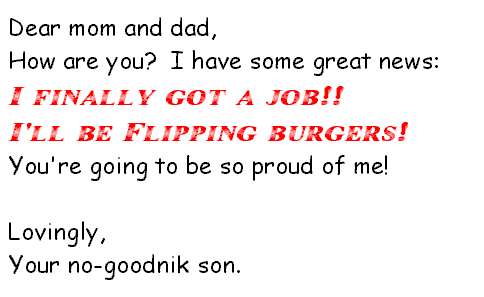
This file will need to be saved to a folder on your hard drive and I would create the folder with the name "WebFonts" , i.e. C:/WebFonts. It is called "EOTFontsBAse.TXT" and needs to be saved as "EOTFontsBase.htm". This file is a simple HTML file that declares the font name to be Tabitha and then displays the text as all the Capital and Lowercase letters of the alphabet together with numbers and symbols and does so three times . . . . in Normal font format. The reason will become clear!
|
|
Now we want to start WEFT and I would recommend using the Wizard features although you can go through the whole process step-by-step as you gain experience in the process and procedures involved. This is the front page of WEFT3 as it opens
You might be asked to reset the Font Database of your computer . . . let WEFT do this because it will look in the Fonts folder and check the True Type fonts you've got installed. You might also like to click on Tools>Set User Information and set up a User name (which can be real or pseudonym, i.e. I use "Bearz") and your email address . . . . this gets embedded inot the EOT file in due course and gives you 'ownership' should it matter to you. :o) |
|
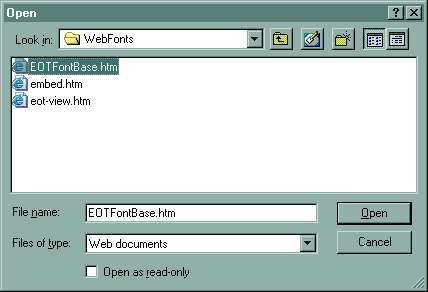
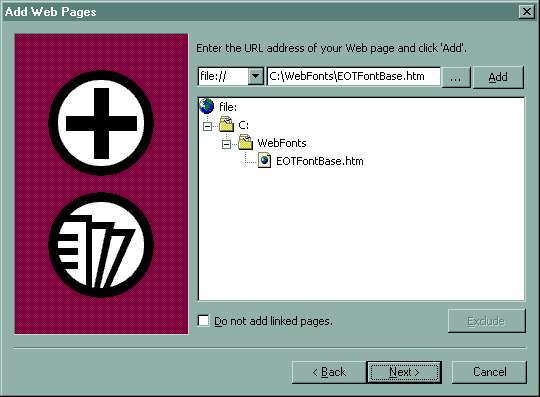
Click on Tools>Run Wizard and you will be asked to insert the source file via the page displayed here.
IIf you click on the three dot button you can browse to the file name (in this case EOTFontBase.htm in C:/WebFonts
Select it and click on Open . . . .
|
|
This opens this window
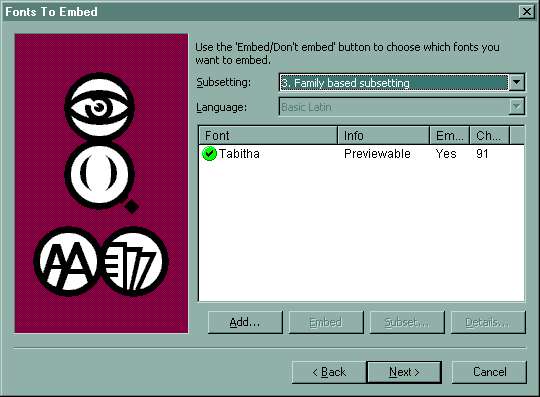
Click on the Next button. TThis will continue the Wizard which will now 'check' the HTM file for fonts used . . . . click the Next button again (in between you get a page offering advice to connect to Microsoft to get information about Weft and embedding fonts . . . . it is worth the trip and this is the URL should you want to visit there another time: http://www.microsoft.com/typography/web/embedding/weft3/weft00.htm After the fonts used have been identified you will see this page . . . .
The green tick against Tabitha indicates that this is the Normal font and that it can be embedded quite properly. Click on Next yet again . . . and you get this screen which needs to have the choice filled in:
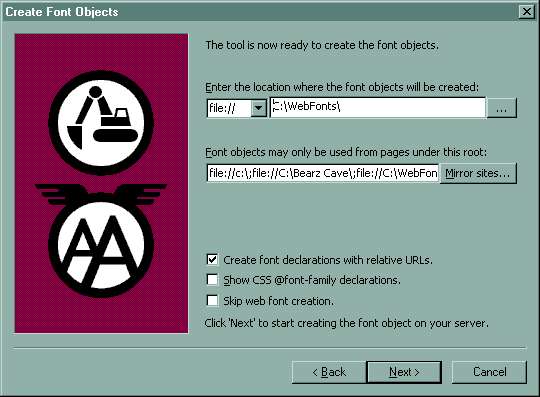
We want to create the EOT in C:\WebFonts\ (please note the backslashes) We also want to insert details of where we might want to 'source' the EOT . . . . after file:// we use backslashes and we need to put in the C drive, C:/WebFonts and other various locations. If you click on the "Mirror Sites button you can use this window to declare the locations:
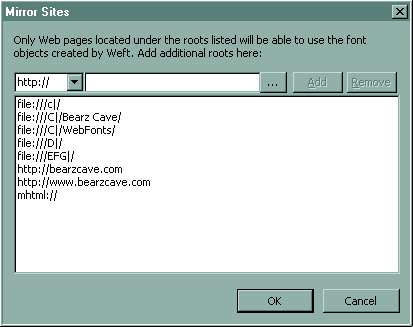
As I use these fonts on my web site I include the Bearzcave URL (both with and without the WWW prefix - this is an oddity of Internet use because some people use the WWW prefix and others don't and so I want the EOT to load whichever way they use the Web and find my Website) . . . . I also want to be able to move the EOT about on my hard drive and have it useable at a later date so I put in the C drive, and D, E, F and G drives should I want to move the EOT to those devices at a later date. MHTML is a means to send parts or all of a formatted web page so we include it as a source. When ready click on Next yet again . . . . this creates the font as an EOT in the C:/WebFonts folder. The final screen gives you the opportunity to save the project . . . . . I never bother but you can do so if you wish. :o)
|
|
That's it - we have created the EOT file and we just need to embed it is our stationery Please click here
Embedding EOT Fonts in Stationery
If you have
followed my Tutorial #6 you will have created an EOT font file
which is sitting nicely in a folder on your hard drive at
C:/WebFonts.
This font is
embedded into the html file
that we used and created as part of Tutorial #6 . . . . .
If you open the
file EOTFontBase.htm we
previously used to create the EOT file from you will see the
following change has been made by WEFT3 |
| <HTML> <HEAD> <STYLE>
</STYLE> </HEAD> <BODY BACKGROUND=""
bgColor=#ffffff> <p><font
face="Tabitha" color="#000000">ABCDEFGHIJKLMNOPQRSTUVWXYZ</p> </BODY> |
|
I've highlighted the part that has been added . . . . basically this is a section that defines style to the HTM file and 'sources' the EOT font declared by naming it and stating where it can be found. This is great if the EOT font and the htm file were to be uploaded to a Web Site where they could be sitting together waiting for someone to open the HTM file and view the page created in the EOT font declared in this changed style definition. However we want to be able to use the EOT font to display our stationery message, in the font in which we want it viewed, on the viewer's computer . . . . . whether the message is sent as a Newsgroup message, private message or viewed by one or many people What we want to do is add into any HTML file used to send stationery messages a little extra that calls up the embedded font and set the HTML file to display this font on the viewer's computer. We need to change the normal font declaration in the HTML file which you'll find in te STYLE tags from a normal font and instead use the name Embedded Open any pre-existing Stationery HTM(L) file in Windows Notepad and change the font name, as seen below . . . . . to Embedded N.B. You will need to change the font colour to suit the stationery background strip or the colour background used and of course the font size may need to be changed, i.e. Tabitha is a small font in that it comes up smaller than most common fonts used, so where you might usually use Size 12 you might prefer to use Size 14 or 18.
|
| <STYLE> BODY { BACKGROUND-ATTACHMENT: fixed; BACKGROUND-POSITION: 0px 0px; BACKGROUND-REPEAT: repeat; COLOR: #000000; FONT-FAMILY: 'Tabitha'; FONT-SIZE: 14pt; FONT-STYLE: normal; MARGIN-LEFT: 10px; MARGIN-RIGHT: 10px; </STYLE> |
| <STYLE> BODY { BACKGROUND-ATTACHMENT: fixed; BACKGROUND-POSITION: 0px 0px; BACKGROUND-REPEAT: repeat; COLOR: #000000; FONT-FAMILY: Embedded; FONT-SIZE: 14pt; FONT-STYLE: normal; MARGIN-LEFT: 10px; MARGIN-RIGHT: 10px; </STYLE> |
|
YYou'll notice that the original font name was enclosed in Parenthesis . . . . after changing the name to Embedded we get rid of the Parenthesis. Now we can add the following text script into the HTM(L) file just before the </BODY> tag which you'll find near the end of the script.
Click here to get this script in TXT format . . . .
|
|
<OBJECT classid=clsid:05589FA1-C356-11CE-BF01-00AA0055595A
height=10 id=efont1 style="DISPLAY: none" width=10> <PARAM
NAME="Filename" VALUE="C:\WebFonts\Tabithae.eot"> <SCRIPT
language=VBScript> |
|
I've highlighted in the above image the part where you can change the script to tell the HTML file where to find EOT font file . . . . . . this is all that needs to change if you want to switch embedded font each time you make a stationery. You may or not have noticed that the EOT referred to by the script is named with an 'e' instead of a '0'. What I do is create a copy of the EOT font created in WEFT3 and then rename it in Windows Explorer as having an 'e' instead the '0' . . . . . . this gives me one EOT font to be uploaded to the Bearz Cave if I choose to do so AND leave one font for use specifically with stationery. (It's a hangover from the early days of creating EOT files when we used to have to hack the EOTs to make them useable in Stationery - fortunately Microsoft now include this 'hack' in the EOT font creation process!) If you choose to just use the EOT fon you've created just for stationery then there is no need to make a copy . . . . . you can either create a copy and rename it OR you can just refer the script to the created EOT file name as it stands!!
|
|
That's it - we have made the EOT file and made the embedding stationery font file and now we just need to embed it is our stationery as I've described it and we can call up the changed HTM(L) file in your Newsreader and send the message to wherever and it will be viewed as sent. I hope this has been helpful. Do let me know if you need any further advice. If you do just click on the Bearz logo below to email |
Outlook Express 5
Tutorial for making Email EOTs with Microsoft WEFT3 ack to Top
Introduction
Microsoft WEFT is a program designed to allow users to see web pages and email in the font that the author used to create them, even if the user does not have that particular font installed on their computer. "WEFT" stands for Web Embedding Fonts Tool, and the embedded font created is called an "EOT", which stands for Embedded Object Type.
The EOTs are viewable within the Microsoft environment, which includes Internet Explorer and Outlook/Outlook Express. Netscape uses a different process for font embedding.
WEFT was designed for web pages. The process to make an EOT for a web page differs from that to make an EOT for email. There are tutorials at Microsoft for making EOTs for the WWW. They currently do not have a tutorial for making EOTs for email. With this document I hope to fill that gap.
This tutorial is has 4 sections: Setting up your computer for WEFT/EOT; Creating EOTs with Microsoft WEFT, Using EOTs in Outlook Express email, and FAQ's.
I am no expert at this, I have just been doing it for a while. The process has gotten much easier with the latest release of Microsoft WEFT. If you tried to make EOTs in the past and gave up in frustration, I don't blame you. I did too. But it's a lot easier now, and I think you'll enjoy the journey. Let's begin:
![]()
Section 1:
Getting Set Up
![]()
Some font designers don't allow their fonts to be embedded. To make EOTs, you will need to check a font's properties to see if the author has allowed embedding of his font. You may do so within Windows Explorer by right clicking on any font file to check it's properties, through a third party font utility, or within WEFT itself . This tutorial uses the WEFT program to check your fonts, but if you would like to also install Microsoft's Font Properties Extension, do so now.
Make a subdirectory to story your EOTs. It is a good idea to keep your email EOTs separate from those made for the WWW as web page EOTs may not work in email. In this tutorial, I use a C:\WEFT subdirectory.
WEFT will be looking for a web page to analyze when it makes EOTs. Although this is a critical step in making EOTs for the WWW, for email EOTs we just need a 'dummy' web page to reference. Open notepad or other text editor, copy and paste this basic HTML code:
<HEAD></HEAD>
<BODY>Testing</BODY>
</HTML>
Note there is NO reference to any fonts in this dummy file. . Save the file as DUMMY.HTM in your C:\WEFT directory, or whatever directory that will contain your email EOTs. Once you make this file, you will not have to alter it each time you create new EOTs, and you won't have to deal with WEFT's issues of using font-families vs. font-faces...all choices will be made within WEFT itself.
Thanks to Charlie Ruland, we now have an Advanced EOT viewer, you can download a copy of it here. Once you have some EOTs, you will be able to preview the fonts created with the EOTs. This enhanced viewer offers full support for many languages, styles and font size selection. You can now choose to have the Unicode 'scalar values' displayed as well. This is useful when you want to write non-ASCII characters in HTML. It's a very useful tool and a 'must have' I might add!
You will need Microsoft's Web Embedding Font Tool (WEFT). Earlier versions of WEFT will NOT work with this tutorial. If you don't have the WEFT RC1, released October 2, 2000, get it now.
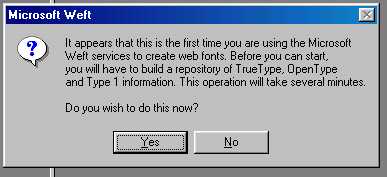
I recommend closing all other programs while the font database is being created, or all fonts may not be included in the font database. This process may take 15 minutes or longer if you have a large collection of fonts.
I have also noticed that WEFT works best recognizing fonts that were installed via the Control Panel Font installation menu. Fonts that were just dragged and dropped into the C:\WINDOWS\FONTS folder are not always recognized as installed fonts.
WEFT can also create EOTs from uninstalled fonts. If you would like to include fonts from a Zip-disk on Drive E, for example, add them to the font database via the Tools Menu. You can actually have fonts on several removable media disks, and the WEFT database will keep track of where each off-line font is stored, as long as you have LABELED each Zip Disk differently.

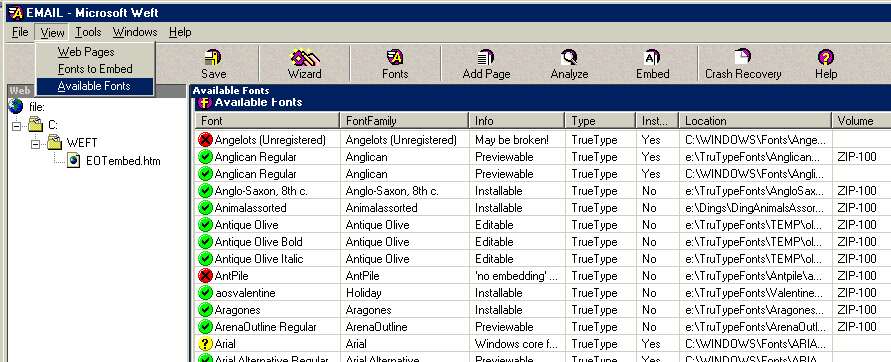
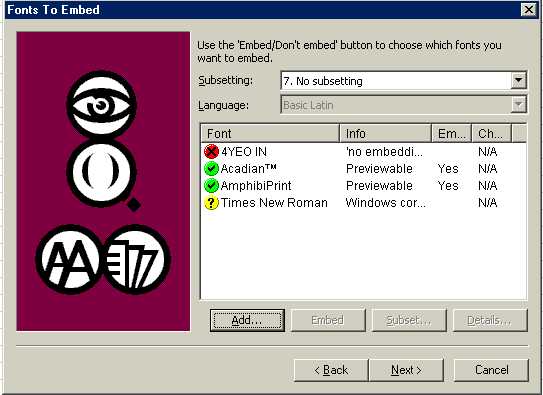
1. Note the red-x's on two fonts. These fonts cannot be embedded either because the author has declared the font 'no embedding allowed' or because the font may be broken or illegally named.
2. Windows core fonts are in Yellow. There would be no reason to make an EOT out of a font that everyone has already. Some other fonts may appear in Yellow if WEFT can't determine some properties of the font. Fonts in yellow are embeddable.
3. If you want to see the actual font, double-click on the font. Check closely the file size, as a large size font file will probably also yield a large EOT file as well. Also look to see how many characters are in the font set. Some fonts do not contain numbers, some are capital letters only, some lack punctuation. If a character is not available for this font, a square box appears.
4. The information on the right of the screen identifies whether the font is installed or not, and the location/volume name where the actual font file resides.
Go through the list of fonts and decide which one(s) you would like to turn into EOTs.
Close it now, we're ready to begin WEFTing.
Section 2: WEFT
Making and Checking EOTs


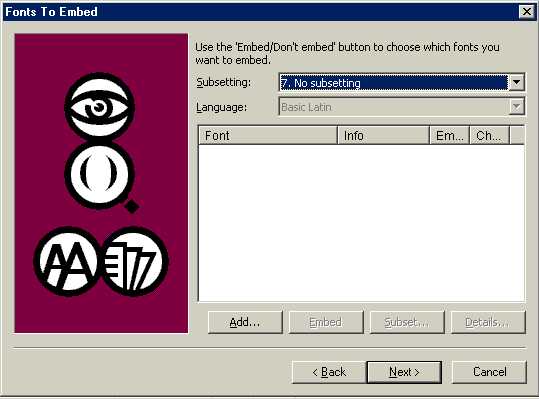
If you select a font that has 'no embedding' properties, it will appear on your list but the 'Embed' column will be empty.
Note: If you had allowed WEFT to analyze your dummy.HTM, your default windows font, such as the Times New Roman, may appear in this window. Or you may select a font, and then decide not to use it for an EOT after all. In either of these cases, un-select the font by highlighting it and clicking the 'Don't Embed' button, which is located next to 'Add'.
The following screen shot contains all of the above examples. Note that two fonts will have EOTs made, I have deselected Times New Roman, and the program will not allow 4YEO IN.
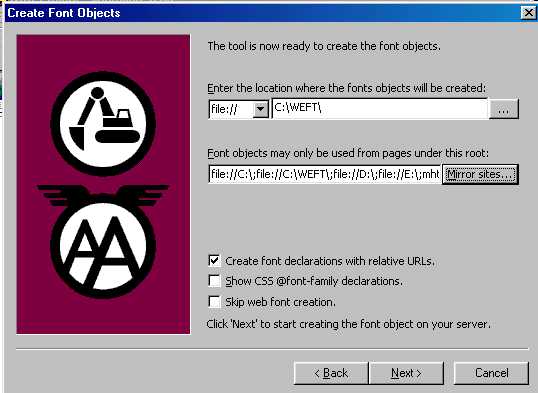
Wizard Step 5: Create Font Objects
First field: "Enter the location where the font objects will be created:"
Type in the directory you made for your email EOTs.
Second field: "Font objects may only be used from pages under this root" field:
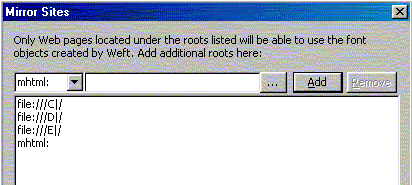
Click on 'Mirror Sites'.
Make sure to select MHTML as one of the choices (nothing in the field to the right), then click 'Add'
It's also a good idea to select 'File' and then type in C:\ then 'Add' so that the EOT is viewable on your C:\ drive. Also select D:\ and E:\ if appropriate. You don't have to have an http: entry for email EOTs. The MHTML is critical for email EOTs. Without this Mirror site, your EOTs will not be visible in email.

If you are making more than one EOT during this session, click 'Yes' to continue. The error messages are very general and don't tell you exactly why it could not create the EOT. WEFT can't make EOTs out of complicated fonts such as many dingbat fonts. Either of these error messages might appear with a complicated font or with an font containing illegal characters in its name. There is nothing you can do to make your EOT if WEFT decides 'No'.
Wizard Step 7: Publish Web Pages
This step is not critical for email EOTs so just put a check mark next to "Do not upload modified pages to my server" and click 'Next'
PAGE: {Stand alone fonts}
MIRROR SITES: file:///c|/;file:///C|/WEFT/;file:///d|/;file:///e|/;mhtml:
--> url(file:///C:/WEFT/ACADIAN0.eot) (Acadian�)
Saving log file at C:\My Documents\WebFontProjects\EMAIL.log
Note that I was attempting to make two EOTs. I got an error message when processing this request, and I see that only one EOT was created. WEFT was not able to make an EOT out of Amphibiprint, even though it was previewable and had a green check mark by it when I selected it from the font list.

You can also look to see what the full font name is...in this case, it's "Calligrapher". You will want this information should you use the font family name as well as the EOT in your email. Close notepad, making sure you DON'T save any changes if asked. Once you close notepad, you may want to rename your EOT to the font's name
There are several reasons I rename my email EOTs. First, it distinguishes email EOTs from those made for the WWW. They are not interchangeable, so this way I don't get confused about which EOTs work in each location. Secondly, it's easier to figure out which font the EOT represents by just looking at the name if it is renamed. For example, renaming CALLIGRO.EOT to Calligrapher.EOT tells me that the underlying font is Calligrapher. Other example: SFPLANE0.EOT doesn't tell me much, but SFPlanetaryOrbiterOutline.EOT tells me exactly what the font is. As we shall se below, there are several ways to embed EOTs in email. Some require you use the font name as well as the EOT name. it's simpler to just name them the same. Again, this is a personal preference step.
3. Viewer the Font created with the EOT:
We can also check the EOT with the Advanced EOT Font Viewer, which we have also saved in the folder that stores our EOTs. Open the font viewer by double-clicking on it while in Windows Explorer. Browse to the path and EOT you just created and click on 'Show Font'.
Congratulations! (I hope). You should see your font in the test message. Again, thanks to Charlie Ruland for creating this tool for us. It is great! Close the font viewer. The EOT has been made, verified and renamed. Let's go on to actually embedding it in an email.
document.writeln("<STYLE> @font-face { font-family: embedded; src: url("&eot1.filename&"); }</STYLE>")
</SCRIPT>
~The "font-family: embedded" section is the link to the font declared within the script. You may change the word 'embedded' to the actual font name the EOT represents. We will be coming back to this piece of code often in the examples below.
~The "url()" section tells the script which media player object id and filename to use for this particular font. Note we see the two pieces of information we included in the <OBJECT> tag -- the "eot1" from the "id=" section and the "filename" from the <PARAM>. When we use just one embedded font, we don't have to make any changes to this part of the script. We will be coming back here when we embed more than one EOT in an individual stationery.
Credits: This code is not mine. It was probably first written by Steve Cochran, the Microsoft MVP who has developed a lot of great OE utilities. Steve's web page at: http://home.highertech.net/~scochran/ .
OK, now that we know what this code means, let's use it.
Start a new email message.
You can put in any address, as we won't be actually sending this one out. Put "EOT test" as the subject.
Make sure you are in Rich Text (HTML) mode. (Click Format on the Menu). Also make sure you have the "Edit/Source/Preview" tabs available at the bottom of your new message. (Click View on the Menu then click to place a checkmark next to Source/Edit).
While in the Edit tab, just type in "This is a test".
Now click on the Source Tab.
BODY {
font-family: embedded;
}
</STYLE>
<SCRIPT language=VBScript>
document.writeln("<STYLE> @font-face { font-family: embedded; src: url("&eot1.filename&"); }</STYLE>")
</SCRIPT>
BODY {
font-family: embedded;
}
</STYLE></HEAD>
<SCRIPT language=VBScript>
document.writeln("<STYLE> @font-face { font-family: embedded; src: url("&eot1.filename&"); }</STYLE>")
</SCRIPT>
BODY {
font-family: calligrapher;
}
</STYLE></HEAD>
<SCRIPT language=VBScript>
document.writeln("<STYLE> @font-face { font-family: calligrapher; src: url("&eot1.filename&"); }</STYLE>")
</SCRIPT>
3. COMBO METHOD:
BODY {
font-family: calligrapher,embedded;
}
</STYLE>
<SCRIPT language=VBScript>
document.writeln("<STYLE> @font-face { font-family: embedded; src: url("&eot1.filename&"); }</STYLE>")
</SCRIPT>
<HTML><HEAD>
<STYLE></STYLE>
<OBJECT classid=clsid:05589FA1-C356-11CE-BF01-00AA0055595A id=eot1 style="LEFT: -800px; POSITION: Absolute">
<OBJECT classid=clsid:05589FA1-C356-11CE-BF01-00AA0055595A id=eot2 style="LEFT: -800px; POSITION: Absolute">
document.writeln("<STYLE> @font-face { font-family: embedded1; src: url("&eot1.filename&"); }</STYLE>")
document.writeln("<STYLE> @font-face { font-family: embedded2; src: url("&eot2.filename&"); }</STYLE>")
</SCRIPT>
Things to note in the above code:
~Each EOT has it's OWN <OBJECT> tag, with a unique "id=eotn" identifier and a different EOT file.
~Each EOT has it's own line of code in the <SCRIPT> tag. That line of code references the id and filename from the corresponding Object.
You can add as many EOTs as you would like to email messages. Just copy the object tags and change the object id to eot3, eot4, etc, and add an additional line to the script for each additional font used, making sure to change both the font-family name and src url id. But remember, each one will increase the overall size of the email. If your recipient has a slow modem connection, it is not wise to embed too many images and EOTs in one message.
Well, that's it. Happy WEFTing
Q. Why can't I use my email EOTs in my web pages?
A. Because any EOTs made for the WWW must contain your web url, made as you created the EOT. If you are using EOTs on your web page, you will need to follow a different set of instructions to make your EOTs. If you want to make EOTs for your web page, I suggest you check out the Microsoft tutorial for WEFT3 itself: http://www.microsoft.com/typography/web/embedding/weft3/tutorial.htm .
Q. I have an EOT...it has the MHTML as a mirror site. But when I use it, only a few characters appear in the EOT font. Why?
A. Probably because it was made with the per page 'subsetting' feature, which does not contain the full character set of your font.
Q. I am using Outlook Express 4. Will these instructions work for me too?
A. The instructions on Making the EOT are the same . OE4 embedded EOTs in the <IMG> tag however, and not in the <OBJECT> tag that is used in OE5. You might want to check out an old WEFT2 tutorial by Eric Miller. It is obsolete in many ways with WEFT3 ,but the files he uses to embed the EOTs were made for OE4 stationery: His site is: http://www.okinfoweb.com/moe/format/format_007.htm.
Q. How come I don't have to use HACKEOT.EXE any more?
A. It was not until the 3b7 beta version of WEFT 3 that the ability to select 'MHTML' as a Mirror site was available. This is the critical Mirror site that is needed for EOTs to be used in Outlook Express email. Prior to this, email EOTs had to be 'hacked' by hand or via this nice (but now obsolete) little program written by Steve Cochran. You can check out his site at http://chattanooga.net/~scochran/ .
Q. I'm quite a techno-geek. Where can I get detailed information on this WEFT stuff?
A. Try the Microsoft Development Networks online workshop: http://msdn.microsoft.com/workshop/c-frame.htm?/workshop/author/default.asp . Remember that a lot of this stuff is for web page EOTs, not email EOTs. Don't let them confuse you! :-)
Q. Can Netscape users see EOT fonts?
A. No. Netscape uses a diferent type of embedded font file called .PFR. Internet Explorer users would have to download an activeX component to view these fonts. For more information on Bitstream Fonts, go to http://www.bitstream.com/categories/products/webfonttools/index.html
Q. I made an EOT but when I use it, only the letters show up. The numbers and puncuation marks show up as boxes. What went wrong?
A. Nothing. Go back to the actual font file you used to make the EOT. Double click on it, and look to see what characters are available with that partcular font. Some fonts only contain all the characters, some are missing numbers, punctuation marks, and so on. If the font doesn't have all the characters available in .TTF format, the EOT won't have them either.
Q. What is the Object and Script code that I have to use to embed EOTs?
A. (text in black is there for positioning reference) (text in red is changeable..see the tutorial for specific details)
<STYLE type=text/css>
body {
font-family: embedded;
}
</STYLE>
</HEAD>
<BODY>
document.writeln("<STYLE> @font-face { font-family: embedded; src: url("&eot1.filename&"); }</STYLE>")
</SCRIPT>
</BODY></HTML>
|
![]()
![]()
Tutorial Links
Embedding Fonts Tutorial
by Steve Mulder
Understanding Embedded Fonts by Melonfire
Indian
Dynamic Font by cdac
Dynamic fonts by languagesindia.
Bitstream
suggests they open TrueDoc PFR technology to Mozilla
Frequently Asked Questions (FAQ) on
dynamic fonts
Frequently Asked Questions by languagesindia
Instructions for using Dynamic fonts
Understanding Embedded Fonts
How to create Hindi Web Pages: The Ultimate
Guide
Developing Website in
Hindi and other Language
Microsoft WEFT 2 v2.0.22c
Microsoft WEFT 3
Weft 3 by
bearzcave
Embedding
Fonts
Embedding fonts in stationery by Biancka
How
to embed fonts in webpages in own handwriting
WebFont Support by Bitstream